|
| Understand why YOU take pictures |
There are many reasons for taking pictures - a couple of the more obvious are:
- To document something;
- To show others what you saw and to convey the emotion you felt when you saw it.
Of these, the last is probably the most common. But, does it aptly
describe the reality of photography?? The short answer is you can NEVER show
somebody exactly what you saw by taking a photograph of it! There are LOTS of
reasons for this and most reasons revolve around the fact that the technology
and physics of optics and sensors can not represent what our eyes see and
how our brains "translate" vision. Don't try to show what was physically in front of the lens
(unless you're trying to document something) - your goal in photography should
be to show to the viewer what you WANT them to see or how YOU saw it, which is
not necessarily how it physically was. That's why photography is referred to as
one of the "arts".
It takes a good knowledge of the physics of photography (f-stops, shutter
speeds, exposure, focus, etc) and a good feel for composition to get the kind of
images you want.
|
|
| What you see isn't always what you get! |
When taking pictures, we tend to want to take the pictures that look good to us.
What makes a picture look good?? Well, aside from the subject matter and composition,
the light has a lot to do with it. How many times have you taken a picture and
couldn't wait to see the results, only to be disappointed? It's happened to all of us.
This can often can be blamed on the fact that the sensor in your camera doesn't see
the same thing your eyes do. Our brain is able to compensate for conditions that your
camera can't. These conditions include color, contrast, sharpness and shape.
Different times of the day and different weather conditions can dramatically change
the "color" of the light. And the color of the light can seriously impact your images!
The light at dawn and dusk are much more red than the mid-day sun. The light on a
cloudy day is much more blue. Your digital camera has a feature called "White Balance".
If set to AUTO, the camera "tries" to figure out what the color of the light is - it
doesn't always get it right, and sometimes it's VERY wrong! Manually setting your white
balance can help you get better images.
Contrast is another area that our eyes exhibit much better adaptability. Our eyes can
accurately see a scene where there is a 2,000 to 1 contrast ratio (equivalent to 11 "F" stops).
In contrast (no pun intended), the sensor in your camera can record a brightness range of
about 5 "f" stops if shooting RAW - less if shooting JPEG. Some beautiful scenes that you
see are not capable of being recorded as you may lose detail in bright or dark areas - or both!!
An easy way to get around this in Landscape, sunrise or sunset images is to use a graduated
neutral density filter.
Our eyes also compensate in other ways. You've probably seen optical illusions.
Our brains make these optical illusions possible. In the example below, the "box"
is perfectly square, but our eyes don't see it that way because our brains
intercept the image and interpret it the way we "think" it should be.
However our camera lenses don't have compensating brains, and see things
"differently". In addition, lenses have aberrations: chromatic aberration
can change color/sharpness; coma aberration affects images at the edge of
a frame; Spherical aberration can distort an image, etc. Our eyes (hopefully)
don't have these aberrations.
As you take pictures, try to remember the conditions (lighting, contrast, etc.).
The more pictures you take, the better feel you'll have for how your camera
reacts to what you saw. Different cameras/sensors will react differently.
Your goal should be to get to the point where you understand what you will get
when you take the picture, understanding that it WON'T be what you saw!
|
|
| Your pictures are better than you think! |
Have you ever wondered why YOUR pictures don't look as good as those in magazines??
For many years I struggled with the fact that my pictures NEVER looked as sharp
as those that I saw in magazines. Additionally, colors and contrast were much
more pleasing in the magazines. I tried everything (almost), but never was able
to understand why I couldn't approach the sharpness, detail and color rendition
that professional photographers were able to obtain. I tried tripods,
expensive optics -- but nothing seemed to help.
Well, the answer was simple. My photographs WERE as good as the magazine pictures
(well, at least SOME of them were). Taking the picture is only HALF of the job.
The other half is "post-processing" - editing your images in image-editing software,
such as Adobe Elements, Photoshop, ACDSee, etc., etc. Most of these programs make it
VERY easy to edit your images so that they look like you want them to. These programs
can SIGNIFICANTLY improve a "good" image. Be aware that they CANNOT help a bad image!!
Another aspect of seeing your images the way they really are is that your monitor must
be "profiled" - that is, when your image has some "red" to show you, your monitor must
be adjusted properly so it shows you "red". Few, if any, monitors show accurate color
until they are "profiled and calibrated". There are some programs that do this, but
generally, a hardware device such as the "Spyder" is needed.
|
|
| Light is Everything!! |
Without light there wouldn't be photography. In fact, there wouldn't be art.
Not even a "paint and brush" artist create a masterpiece without light. In art,
as well as in photography, light is everything. It's the artist's ability to
render a subject in an appropriate light that creates a great piece of art.
An artist has a great advantage over the photographer, however. If he or she
can imagine it, it can be painted. The photographer has a choice -- either MAKE
the light (not too difficult in the studio), or WAIT until the light is right
when outdoors. Waiting is the hard part. A lot of photography is being in the
right place at the right time. You can either be VERY lucky, or you can use
your intelligence to anticipate good light. Anticipation isn't very difficult.
If you look at 10 great landscape photographs, I think you'll find one thing
in common with all of them -- long shadows and warm colors.
Long shadows come from a low angle of light. The warm color come from the sun's
light penetrating more atmosphere when shining at a low angle. The light just
after dawn and before dusk provide the best light for just about any kind of
outdoor photography. It's a much warmer light. And the low angle provides more
shadow areas thus emphasizing form and texture.
Taking pictures at these times can yield your best photographs!
When traveling, I always get up before dawn and go to bed early. Depending upon
how far north you are, you can catch both dawn and dusk (if you go far enough
north, there may not even be a dawn or dusk, however, even with a 24 hour day,
the light is ideal for most of the night!). During the mid portion of the day,
I concentrate on photographing bright colors. But at either end of the day, I
leave time for the "good light".
One of the benefits of living on the east coast of the United States and traveling
to the west coast for photo trips, I keep my internal clock on east coast time
when traveling -- getting up at 4:30am (7:30am east coast time) and going to bed
at 8pm (11pm east coast time). That usually allows me to photograph both dawn
(my personal favorite) and (sometimes) dusk.
I read an article a few years ago that asserted that it is impossible to take a
good picture during mid-day. I think that's going a bit too far with it, but
it does emphasize the point.
Don't settle for just any light -- Make the photograph worthwhile -- wait for
the light.
|
|
| Do your Homework! |
Before embarking on a vacation, do your homework and learn as much as you can
about your destination. The Internet opens up some wonderful opportunities for
learning about your destination. Plan your days around recommended sites.
You can maximize your vacation investment by learning from other people's
experiences (and mistakes). You can't always bring ALL of your equipment,
so just make sure you bring the RIGHT equipment.
Before leaving home, I generally know when dawn and dusk will be; what locations
will be better for dawn; and which for dusk. I try to read as much about a new
location as possible so I spend more time photographing what I want to photograph
than trying to figure out where to go next!
|
|
| Exposure |
Learn ALL you can about exposure. The difference between a great
picture and an "OK" picture is often exposure. Bracketing can
help – I almost always bracket by 3/4 or a full stop any images that I
really like. Most of today’s cameras will handle the exposure for you,
but in unusual cases (dark or light subjects) the meter will be fooled
and your pictures won’t reflect what you want. Understanding how to handle
these situations is very important. For example, shooting a snow scene
requires that you overexpose from 1 1/2 to 2 stops to capture the detail
in the snow. To bracket a snow scene, I generally take 3 exposures -- 1, 1½ and 2
stops overexposed from what my camera's internal meter reads. Or else, I take
a spot reading on an object that resembles 18% gray.
Another interesting aspect of bracketing is that the middle exposure (the
one that the camera meter indicated was correct) is usually properly exposed,
however sometimes, the underexposed or overexposed shot is significantly
better than the correctly exposed picture. There's no way to know this unless
you take three pictures with one underexposed and one overexposed.
|
|
| Be Steady - Tripods |
There is NOTHING worse than taking a blurry picture (unless you did it on purpose)!
The most common problem is when the camera figures out what shutter speed to use.
Sometimes it picks a shutter speed that is just TOO SLOW for you to take a
non-blury picture. Using telephoto lenses (those that bring you in close) are VERY
difficult to use without bluring. There is a general rule of thumb that indicates:
"The slowest shutter speed you can hand-hold a camera is 1/focalLength"
In other words, when shooting with a 50mm lens, the slowest shutter speed you can hand-hold
your camera is 1/50 second; with a 300mm lens it's 1/300 second. Most AUTO pictures are taken
with shutter speeds of about 1/50 second. So you can see it's pretty hard to use a telephoto lens
without bluring.
There are many ways to stabilize your camera. Tripods are pretty easy to use but bulky. Cheap tripods are NO GOOD!
We teach workshops and have seen MANY really BAD tripods. A bad tripod is worse than none!
If you do use a tripod, you don't just plop the camera on it and take your picture.
There are subtleties that aren't obvious. The more you extend a tripods legs,
the less stable the tripod becomes. The center column of a tripod is the worst.
I almost NEVER extend the center column of my tripod. However, there are times
when you need to, and you're still better off than not using a tripod.
Many tripods come in two flavors: 3 leg tubes and 4. I'm not talking about how
many legs there are, but how many tubes there are in each leg. The fewer extension
tubes per leg the better. Four tubes are less stable than three.
The head that you choose has a lot to do with how stable the camera is on top of
the tripod. If you have a heavy camera and lens combination, you need a sturdy head.
Using a light-weight head can ruin the purpose of using a tripod as the camera
can slowly slip and move during the exposure.
To make the best use of your tripod, there's a simple trick. I RARELY use a cable
release! Most of my pictures are taken at slow shutter speeds - i.e. 1/100 - 1 second.
At these shutter speeds, I press firmly on top of my camera or lens at the position
directly above where it's mounted on the tripod during the exposure and make the
exposure by gently pressing the shutter button. My hand dampens any vibration
from wind, mirror, shutter, etc. The results of doing this has been startling
when using long lenses (300mm-600mm) and slow shutter speeds.
Some people like to "hang" a heavy weight from the center column of their
tripod to help stabilize it. I find this isn't necessary when pressing
on the camera or lens as described above and is a lot simpler. Some people
also like to press their eye against an eye-cup on the camera when
making long exposures. This helps dampen horizontal movement as well,
but I've not found this to be necessary.
|
|
| Be Steady - Other Ways to stabilize |
A tripod isn’t always practical. In these cases there are two other solutions
that I like to use. One is a bean bag. You can make your own by sewing two
pieces of 8 inch square cloth together on three sides and putting a zipper
on the fourth. Fill the bag with lentils or small beans. If you're not the
do-it-yourself type or you just want a more professional solution, you can
purchase the Green Pod Check
here.
You can then rest the bean bag on something sturdy (rock, tree, table, etc)
and put the camera on the bean bag. This will allow you to stabilize the
camera and helps prevent camera movement during the exposure. ). It works
extremely well and can be better than a tripod if you have something to support it.
Another solution is the SteadePod. The SteadePod is a stainless steel wire that
is held in a very compact case. The wire can be extended when taking
pictures – you step on the end of the wire (there’s a flat “foot” support at
the end of the wire) and you attach the other end to your camera’s tripod
socket. You then place slight upward pressure on the camera which tightens
the wire and helps stabilize the camera. It takes the place of a much
larger monopod. You can see the SteadePod
here.
|
|
| Compose, compose, compose! |
Composition is critical. Learn the basic concepts of composition. You won’t
always want to follow these to the letter, but understanding them will help
you to know when to use them and when to break them.
The "rule of thirds" is a generally accepted guideline for composition. The
subject should usually be placed near the intersecting lines when the viewfinder
is split both vertically and horizontally in thirds. The white lines on the
following pictures indicates these positions.
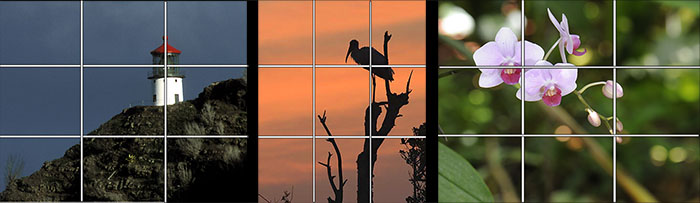
The idea is to keep the subject from being centered in the picture. Horizon lines
(such as the sky or water) should generally be placed at either of the two
horizontal lines in the above diagram. Again, the idea is to keep from
centering the horizon lines. But... sometimes, centering DOES work - but not often!!
Also, when photographing a person or animal, the subject should generally be
facing into the picture. So, if you photograph a person and their head is at
the upper left intersecting-line in the above pictures, you may want them
to be facing toward the right, or center of the photograph.
The "rule of thirds" is only a guideline and sometimes should be broken to
improve a picture, but, when first learning composition, you should try to
stick to it. Once you get the feel for composing your pictures, you can
start to deviate when you feel it's necessary.
|
|
| Using a Polarizing filter |
The Polarizing Filter is probably the MOST mis-understood filter. Some people
tell me they leave it on their camera ALL the time (really BAD idea!!) and some
people tell me they only use it to darken blue skies - which it can do, but
sometimes it just makes images look horrible!!
A polarizing filter can reduce or eliminate reflections. Reflections can occur on
glass, water or in the air (in the air, there are dust particles that light
reflects off of). But reflections occur in almost EVERYTHING. For example,
ligt reflect off of grass, leaves, flowers, skin, etc., etc. Reflections
show up as "white", or almost white, areas in images. Since a polarizing
filter can cut relfections, you can increase the color that your camera sees
by using one. But, it doesn't always work. Polarizing filters work best if
the light source (typically the sun when outdoors) is at 90 degrees to what
your photographing. So, they provide NO use when the sun is behind or in-front
of you, and provide varying degrees of effectiveness as the sun approaches 90
degrees. Because of this, polarizing filters create a bad effect when used with
wide angle lenses, since part of the image may be at 90 degrees to the sun, while
other parts of the image may be at 0 degrees to the sun. In these cases, the sky
may be very saturated where the sun is at 90 degrees and have no additional saturation
where the sun is at 0 degrees.
You don't consciously see most reflections. For example, imagine looking at two
red leaves - one is wet and the other is dry. If the sun is shining from behind
both leaves, you will see glare from the water on the wet leaf and won't see
the red color as well as you do the dry leaf. By eliminating the "glare" of
the reflection, you can see the true color of the object. Even on the dry leaf,
there will be some reflection. If you could eliminate all of the reflection
from both leaves, they would look equally saturated.
Why can a polarizing filter make a blue sky "blue-er"? It's because there are
very small particles in the atmosphere that light reflects off of. If you can
reduce the reflection from these particles you can see the sky as a deeper blue.
There are two types of polarizing filters: linear or circular. Older cameras used
linear polarizers. These are more effective than circular polarizers, but linear
polarizers won't work with cameras that have a through-the-lens (TTL) metering
or autofocus - which almost all cameras now have.
Take a look at both of these two pictures - one taken with a polarizer and the
other taken with no filtration - both taken seconds apart in the same light:
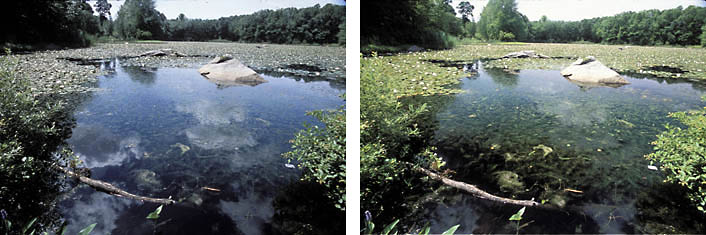
The picture on the left was taken without any filter; the one on the right
with a polarizing filter. On the left you can see the reflection of the sky
and clouds in the water (the water reflects the skies color). The colors are a
bit more muted than the picture on the righ as you are seeing glare from light
reflecting off of most everything in the scene.
The picture on the right was taken with a polarizing filter.
You can see INTO the water and see the plants growing in the water, but you
lose the reflection of the sky and clouds. All of the colors are more saturated.
This is primarily caused by the reduction of reflection from the surface of
most objects in the scene.
Each picture is very different. Which picture do you like better?? The color
saturating effect can be UN-NATURAL and can make a scene look somewhat "fake".
Of course, you may want this effect. If you're only using it to intensify a
blue sky, you can create a VERY un-natural scene and a polarizer is not being
used to its best advantage. One big advantage of the Polarizing filter is that
it can be used to cut reflection just a little or a lot - depending upon how
much you turn the filter.
The lesson is: Don't automatically reach for the polarizer for every picture.
Understand what it will do for a scene and use it as a tool for accomplishing
something specific.
|
|
| Focus |
Autofocus is a great took, but you must first learn how to use it. "Single
servo", "continuous servo", using one or more AF points, etc., etc. are all
options and decisions to be made. Understand what each AF feature on your
camera performs and how you can best use it. You WON'T get pictures in-focus
if you don't invest some time to learn about your camera.
Learn to use depth of field to your advantage. When you focus on an object,
depending upon the distance to the subject, lens opening and focal-length
lens your using, a certain portion of the picture will be in focus. Smaller
lens openings (e.g., f16) have more in focus (more "depth of field") and
larger lens openings (e.g., f4) have less in focus (less "depth of field").
If you take a picture of a person, you might want very little else in focus
other than your subject. This will help "isolate" the person you're
taking the picture of so the viewer will be "drawn" to the person, rather
than the background or foreground. When photographing a landscape, you
might want a lot in focus. Learn to understand how depth of field works.
|
|
| Summary |
- Learn and understand exposure - and "bracket" your best shots
- Wait for the "Good Light"
- Understand your film and the differences between what it sees and what you see.
- Learn the composition basics - and understand when to "break" the rules.
- Use something to help stabilize your camera
- Do your homework - learn all you can about your destination.
- Take lots of pictures.
- Learn how to use a Polarizing filter to improve your images
- Learn to use depth of field to your advantage.
|
|