There's a few tricks to
taking sharp pictures. First of all, let's examine what causes us
to take unsharp pictures.
When I said move the camera - I meant
for you to change your perspective!
The first of the suspects is camera movement - that is, you
press the shutter and physically move the camera as the shutter opens
and closes. You don't have to move the camera much to kill a
picture! Here's a close-up of the center of 3 pictures - all taken at
the same time with available light and a hand-held camera at 1/60 second
with an 85mm lens. No attempt was made to move the camera in the
first two pictures but you can see a significant difference. I
must admit, I did attempt to move the camera in the third image, but not
by much! You can see how easily camera movement during the
exposure can kill the sharpness of a picture.
So, how do you eliminate camera movement? Here are
some ideas. First of all, there's a well-known "truism" in
photography that goes like this:
"The slowest shutter speed you should use when hand-holding a camera
is 1/[focal length]."
That means, if you are using a 50mm lens, then the
slowest shutter speed you should use is 1/50. With a 300mm lens,
the slowest shutter you should use is 1/300. Now for the reality:
There is NO shutter speed that will eliminate camera movement!
Well, it's a matter of perspective. When you shoot with a shutter
speed of 1/500, very little camera movement will be observed in a 4"x6"
picture. However, blow it up to 16x20 and it's
likely you will see some difference between a hand-held picture and one
that was taken on a tripod. Also, if you're using a low ISO, it's unlikely
you'll be able to use very fast shutter speeds. The point is, no matter what
shutter speed you use, learn to hold your camera steady and to press the shutter
very gently without moving the camera.
Focal Length
The focal length of your lens also affects sharpness.
Have you ever looked thru high-power binoculars? They're hard to
hold still as the slightest movement is exaggerated and the subject
tends to bounce around while your viewing it. The same thing
happens with longer-focal-length lenses. A 200mm lens or longer is
very hard to hand-hold without getting some camera movement at almost
ALL normal shutter speeds. A 400mm or longer lens is absolutely
impossible to hand hold and get reasonably sharp results! That's why you'll almost
always get better pictures from a wide-angle lens than a telephoto lens.
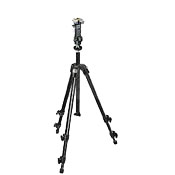
Tripods
Tripods are a great help in getting sharp pictures.
The main purpose of a tripod is to steady the camera when you trip
the shutter. By mounting your camera on a device that is
firmly supported by three legs (humans only have two, and they're not always steady!), we can
eliminate most of what causes camera movement. Tripods come
in several styles. They all have three legs (otherwise they
might be called quad-pods) but each leg can come in either three
or four sections. Since the purpose of the tripod is to
"steady" the camera, you want a tripod that is as steady as
possible and tripods with three-section legs are steadier than the
four-section legs. So when looking for a tripod, look for
one with no more than three sections per leg. |
 |
There is usually a center-post in most tripods. Don't
extend it - make sure it's as low as it goes. The one thing that
makes a tripod UNSTEADY is when you extend the center post. You're
better off extending the legs than the center post.
Tripods need Help!!
However, they are not an answer by themselves. When
mounting your camera on a tripod, you have several options for
"tripping" the shutter:
Your Finger: This method has advantages.
It's quick and easy. It also can help dampen vibration. It's my preferred method.
Cable Release: This method is more cumbersome as
you need an additional piece of equipment. A cable release used to be an
inexpensive piece of equipment, but most cameras today use an electronic
cable release that can be quite pricey. It connects to your camera to trip the
shutter without touching the camera. The idea is that when you
"touch" the camera, you're likely to move it, even if it's on a tripod.
Self-Timer: This method is a way to achieve the
advantage of a cable release, without one! You set the camera's
self-timer to take a picture - usually in about 10 seconds. The
advantage is you don't touch the camera when the picture is taken, but
the disadvantage is you have to wait 10 seconds or so - and not all subjects
like to wait!
Here's a radical thought!
What if you were to touch your camera (on purpose) when you trip
the shutter?? Not only that, but you were to use your finger to
trip the shutter?? You don't need any additional equipment, and
it's easy. But, is it effective??
These three images are extreme blow-ups of the center of the frame.
Each picture is of a tree trunk with some vines on it. They were
all taken using a solid tripod at low ISO with a Nikkor
300mm/f4 lens, a shutter of 1/15 second. The
first image was taken with a cable release. The second was taken
with a cable release and by pressing on the camera directly above where
it mounted on the tripod (actually, this lens has a tripod collar and I
pressed on the lens collar). The third image was taken using the
mirror-lockup feature of the camera AND pressing above the tripod
mounting point.
As you can see, each image is progressively a bit sharper. Mirror lockup
is a great feature, but is often only found on high-end cameras. You may not have that feature. But, a very useful technique is to
press on your camera directly above the tripod mounting point.
What that means is that if your camera body is mounted on the tripod,
you should gently press on the top of your camera when you take the
picture. If your lens mounts on the tripod, you would press gently
on the lens collar. This seems like a radical thought to many
people, but I can assure you that it works! The mirror vibration
travels up the lens causing movement during the exposure. By
pressing on the camera or lens, you dampen that vibration. The
longer the lens, the more the vibration affects the image. I use a
600mm lens with 1/15 second shutter speeds often when photographing
birds with very slow film and I can get tack-sharp pictures if I
carefully press directly above the tripod mount - of course I usually
use mirror lockup as well with that combination as well.
Lens Sharpness
There is often a misconception that using the smallest lens aperture of
your lens will yield the sharpest pictures. This is WRONG!
The smallest lens aperture will yield the most Depth of Field -
but will not yield the sharpest pictures. Generally, the sharpest
pictures can be had with the aperture that is 3 stops closed from "wide
open". Thus if you have a 50mm/f2.8 lens, the sharpest pictures
will be taken with an aperture of f8:
| f2.8 |
|
largest aperture |
(wide open) |
| f4 |
|
|
(1-stop closed) |
| f5.6 |
|
|
(2-stops closed) |
| f8 |
|
«Sharpest point |
(3-stops closed) |
| f11 |
|
|
|
| f16 |
|
|
|
Autofocus vs. Manual focus...
Autofocus is common among newer cameras. It offers the ability to
automatically focus on an object that IT thinks is the subject. If you center
your subjects or use a "closest-object" feature to automatically focus on, this
MAY work SOME of the time. But autofocus doesn't work ALL of the time. If you
like the feature, you should use it, but learn where it fails. After a while
you'll get to see where it works and where it doesn't - and where it doesn't,
you should revert to manual focus.
|