The Shutter
Speed you select is one of the three components that determines how
much light passes thru your lens and strikes the sensor - your exposure.
 |
Film Speed |
How sensitive
the film is to light |
|
|
Aperture (Lens Opening) |
The amount
of light that
reaches the sensor |
|
|
Shutter Speed |
How long
light reaches sensor |
The shutter speed controls how long the sensor is exposed to the light.
The longer the sensor is exposed to light, the more of an impact the light
has on the sensor. If too much or too little light reaches the sensor,
you picture will lose details - it will be either too light or too dark.
The shutter is a mechanical device that opens for a brief period of time -
typically a fraction of a second.
The shutter adjustments of older cameras are mechanical and are
typically located on the camera body on a dial like this one:

On newer cameras, the shutter is electronic and is often displayed in
a Liquid Crystal display (LCD) and you will often adjust it by turning a
simple dial. It all depends upon the model of camera.
If you look at the shutter dial above, you can see that the shutter
speeds are shown as:
| B |
1 |
2 |
4 |
8 |
15 |
30 |
60 |
125 |
250 |
500 |
1000 |
| Bulb |
1/1 |
1/2 |
1/4 |
1/8 |
1/15 |
1/30 |
1/60 |
1/125 |
1/250 |
1/500 |
1/1000 |
All of the shutter speeds, with the exception of "B" are a fraction of
a second. For example, 15 indicates one-fifteenth of a second
(1/15). 125 indicates 1/125th of a second, 1 indicates one second
(1/1). "B" stands for "Bulb". This means that as long as you
hold the shutter open by pressing on the shutter button (or by using a
cable release), the shutter will remain open. This is used for "time
exposures". When cameras display longer shutter speeds (i.e., greater than 1
second), they are generally expressed as 2" - for 2 seconds, 3" - for 3 seconds,
etc.
On older cameras, these shutter speeds are not continuous - that is,
you cannot set the dial between any two speeds. You must select one
or another. So, a shutter speed of 1/200 is not possible on older
cameras. Newer electronic cameras allow you to select any
speed between the slowest and fastest shutter speeds.
The physical shutter inside Digital Single Lens Reflex (DSLR) cameras is normally
inside of your camera body, although a very small number of cameras have them within the lens.
How much light are we talking about?
Each shutter speed allows either twice or 1/2 the light to reach the
sensor. For example, a shutter speed of 1/125 of a second allows TWICE
as much light to reach the sensor as a shutter speed of 1/250 second.
| going from 1 second to 1/2 allows 1/2 as much light reach the sensor |
| going from 1/250 to 1/500 allows 1/2 as much light reach the sensor |
| going from 1/30 to 1/15 allows TWICE as much light reach the sensor |
| going from 1/125 to 1/60 allows TWICE as much light reach the sensor |
You may remember from the previous section that each f-stop has
a similar relationship:
| going from f4 to f5.6 allows 1/2 as much light reach the
sensor |
| going from f5.6 to f8 allows 1/2 as much light reach the
sensor |
| going from f8 to f5.6 allows TWICE as much light reach the
sensor |
| going from f5.6 to f4 allows TWICE as much light reach the
sensor |
As you can see, there is a direct relationship between shutter speeds
and f-stops. We'll save that for the section on "Exposures".
The shutter speed you select can have an impact on the pictures you take.
For example, a slow shutter speed will cause a moving subject to be
blurred while a fast shutter speed can cause a subject to be "frozen" in
place.
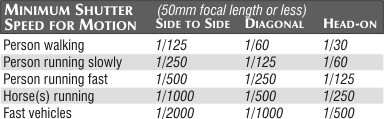
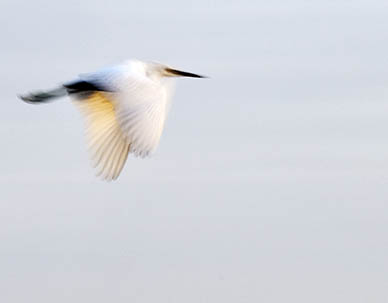
Here are some examples of shutter speeds that can be used to "freeze"
motion. Note that the shutter speed will be different depending upon
the direction the movement is to the camera:
Technically speaking...
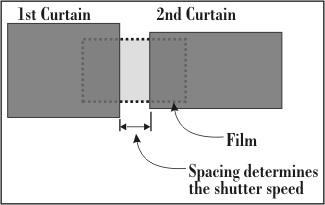
There are two common types of shutters on cameras: the
LEAF (or diaphragm) and the Focal Plane. 35mm DSLR cameras typically
have a "focal plane" shutter.
The focal plane shutter can be made of either fabric or metal and is
made up of two independent opaque "curtains". Each of these
"curtains", traverses the film plane simultaneously in a horizontal
motion. The spacing between these curtains determines the shutter
speed.
This type of shutter can cause problems when using an electronic flash
because the flash is of such a short duration, it may only provide light
to a small "slit" of the sensor. Most focal plane shutters can expose an
electronic flash at shutter speeds up to about 1/60. Some cameras
are capable of using electronic flash with a focal plane shutter at higher
speeds. Often the shutter speed is indicated in RED that can be used
with electronic flash. In the picture above, you can see where the
shutter speed of 125 is in red, indicating that this is the maximum
shutter speed that can be used with electronic flash. Slower speeds
(i.e., 1/60, 1/30, etc. are all OK, but faster shutter speeds will cause a
loss if image with electronic flash.
Blurring...
The shutter speed you use has an effect on two aspects of your
pictures.
When you take a picture, you usually hold
your camera and press a shutter button with your finger. Most of us aren't
rock-steady, and we tend to move the camera a bit when we take the
picture. You don't have to move it much to cause the picture to be
blurry - just a fraction of an inch in the space of, let's say, 1/30 of a
second. That's not much time - but it's enough to cause a blurry
picture. Now what if you took a picture at 1/2 of a second. It
doesn't sound like much time, but it's impossible to hold a camera steady
for that long a period of time! So, depending upon how steady you
are, there's some minimum shutter speed, after which all of your pictures
WILL be blurry because of camera movement. Camera movement is also
affected by the focal length of the lens you're using. For example,
it's easier to hand-hold a camera with a 50mm lens than it is with a 200mm
lens. Using a 200mm lens, your movement is exaggerated (like looking
thru a pair of binoculars). The rule of thumb is that
your minimum shutter speed for taking a picture is 1 / <focal length>.
For example, with a 60mm lens, the slowest shutter speed you should use
when hand-holding the camera is 1/60 second. Anything slower and you
will blur the picture. Now, that's only a guideline. May or
may not work for you. A solid tripod is the only way of truly
assuring that your pictures aren't blurred because of camera motion. When
hand-holding your camera, you need to get into the habit of checking your
shutter speed EVERY TIME before pressing the shutter button to make sure it's
fast enough so you don't blur the picture.
The second way it affects your pictures is
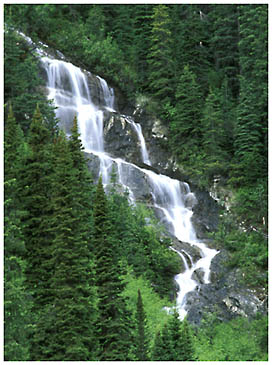
that you can use blurring to your advantage! One of the most common
techniques to photograph waterfalls or fast-moving water is to use a very
slow shutter speed. This technique requires the use of a tripod or
other means to steady the camera as you won't be able to hold the camera
steady for the length of the exposure. An exposure of between 1/15
of a second and 2 seconds works very well. As long as the camera is
steady, the slow shutter speed will cause the moving water to blur but
will keep everything around the water sharp.
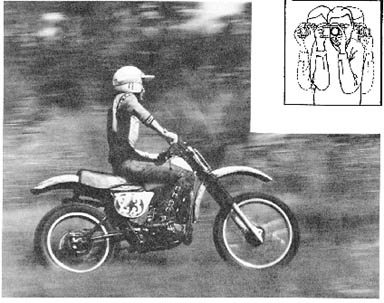
You You can also use a slow shutter speed to "pan" your subject. This
technique is somewhat difficult to master. You use a slow shutter
speed of about 1/15 or 1/30 of a second and take a picture of a moving
subject such as a person riding a bike. You then purposely move your
camera keeping the subject in the viewfinder as they ride by you panning
the camera horizontally in the direction the subject is moving. What
you end up with (if you did it right!) is a relatively sharp subject but a
blurred background. This type of a picture effectively shows
"movement" in the subject, rather than capturing them sharply using a fast
shutter speed where they appear to be "frozen in time".
Exposure Modes
Automatic cameras often have several exposure modes: Program
mode, Aperture Priority, Shutter priority and Manual.
Shutter Priority means that YOU select the Shutter speed and the
camera's internal meter determines what aperture to use. You lose control over your aperture this way but gain
control over the shutter. This is what you want to use when you want
to either blur or freeze a subject.
Of course you could also use MANUAL mode you gain full control by setting both your
aperture and shutter. You'll need a light meter - either one in your
camera or a hand-held meter to determine what your shutter and aperture
should be set at.
|